Setting up Perspectives AI
To start using Perspectives AI, an administrator needs to enable the feature for your database, and individual users need to install the Chrome or Edge browser extension. Follow the steps below to get started.
Administrator setup (one-time)
An account administrator only needs to complete this setup once for your entire database.
Admin Access Required.
- Log in to your account, go to the Settings tab on the sidebar, click Security, and then select Permission Groups.
- Select a permission group to add Perspectives AI to, or create a new group.
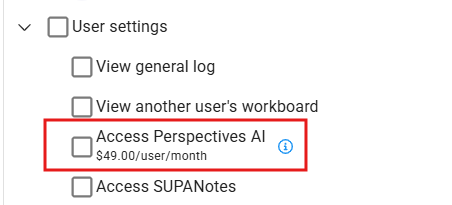
- Enable Perspectives AI:
Open the User Settings category and check the box next to Access Perspectives AI.
NOTE: Once enabled by an administrator, all clinicians assigned to that specific permission group will automatically have access to the feature.
Browser extension setup (for all users)
Every clinician using Perspectives AI will need to install and pin the browser extension to use the tool daily.
1. Install the extension
If you haven't installed the browser extension yet, use the link below to get it directly from the web store:
2. Pin the extension
To ensure Perspectives stays easily accessible in your browser toolbar, you should pin it.
- Click the Extensions icon (looks like a puzzle piece) in the top-right corner of your browser window
- Find Perspectives in the dropdown list
- Click the Pin icon next to it so it stays visible on your top toolbar
How to use Perspectives in BestNotes Fresh
Once the browser extension is enabled and pinned, Perspectives is ready to use during your patient sessions.
Finding the Perspectives Orb
When you log in to BestNotes, you will see the Perspectives orb appear automatically in the bottom left corner of your screen.
Tip: If the orb is blocking an important part of your screen, you can click and drag it to any location you prefer.
Recording a session
Follow these steps to record a clinical session and automatically populate your documentation:
- Start recording: Hover your mouse over the Perspectives orb and click the microphone button to begin recording. Conduct your patient session as you normally would.
- End the session and assign details: When your session is finished, click the end session button. Next, add the patient you are recording and select the specific form or forms you are trying to fill out.
- Generate and populate your note: Click Generate Note. Once the forms have finished loading, navigate to the specific page for the form you would like to complete, and click the fill form button to automatically populate the data.
Dictating a session
If you prefer summarizing a session after it concludes rather than recording it live, you can use the dictation feature.
Best practice for dictation:
- Speak naturally: Speak like you would to a colleague—there is no need to use punctuation commands.
- Add follow-up instructions: After a session, you can add specific instructions regarding what to emphasize, what to include, or any specific phrasing you want used in the final note.
- Start dictating: Open the sidebar and click the Dictate button. Speak naturally and describe exactly what happened in the session.
- End and assign details: When you are finished dictating your summary, hit the Complete Session button and click Confirm. Add the patient you are dictating the session for and select the form or forms you will be filling out. Click Generate Notes to create a transcript of your dictation.
- Populate your forms: Once the transcript is complete, navigate to the patient's chart and open the form you would like to complete. Click the Fill Form button to populate the document.
Telehealth sessions
Perspectives can also be used to document your virtual appointments, provided they are conducted directly within your web browser.
Important Limitation: Perspectives currently only works for telehealth sessions hosted in the same browser. It does not support standalone desktop applications like Zoom Desktop.
- Select Telehealth Mode: In BestNotes, hover over or click the Perspectives orb, select the Telehealth option, and click Record.
- Open your meeting tab: Navigate to the specific browser tab where your Google Meet, Zoom, or Microsoft Teams call is active.
- Confirm and start: Click the extension icon to begin the recording. From there, you can continue your telehealth session as usual.
Obtaining consent
Patient consent must be obtained and documented before recording any session. There are several compliant options available for your clinic to manage this requirement.
Consent options
- Intake packet form: Put an AI consent form directly into your patient intake packet. Submit your clinic's AI consent form to team@bestnotes.com for template creation.
- Verbal consent: Before beginning each recorded session, you can obtain verbal consent by covering the following points:
- Notify the patient that you will be recording the session.
- Explain the purpose: the recording is used strictly to assist in clinical documentation.
Inform them that they have the right to deny consent or revoke it at any time.
Ensure you record their verbal agreement as part of the session recording itself.
Recommended approach: Both a written consent form and a verbal reminder. Using a written form during intake combined with a quick verbal reminder at the start of each session provides the most comprehensive protection. This captures their continued agreement directly on the recording, ensures ongoing informed consent, and helps patients feel comfortable with the process.
NOTE: If a patient does not consent to being recorded, or if you are unable to record a session for any reason, you can still use the Dictate feature after the appointment to have Perspectives write the note for you.
Back to top of page